If you haven't started de-potting your products, drop whatever you are doing and get on it... like now. I have ran into this problem every time I fall in love with a new palette, I end up obsessed with about half of the shades and hit pan on them way before I run out of the other shades. I always tried to hunt down the individual shades that I had fallen for, just to end up with a cosmetic bag of a zillion individual eye shadow and blush compacts. Dolls, I have seen the light! Creating your own customized palette streamlines your makeup routine, organizes all of those loose compacts, and makes packing ridiculously easy. Another perk: you don't have to repurchase palettes just to use 50% of the shades anymore! (MAC and MakeupGeek sell pan versions of all of their powder eyeshadows and cheek colors so you don't have to de-pot... and they're generally around $2 cheaper than their compact counterparts!)
 First, start out with a Z-palette (you can find them here http://www.makeupgeek.com/store/palettes/empty-palletes.html for less than $20). You can choose whatever size and style packaging that may strike your fancy, but word to the wise, go for the big one... you'll be filling it up in no time! You'll also need the magnetic stickers, so grab those too. Now go grab your fave individual shadows, blushes, and bronzers. I filled mine with my UD and NYX individuals shadows, a NYX blush, and a Physician's Formula bronzer, but anything you want to make portable works! I will link the youtube tutorial I followed in de-potting below. It literally takes 3 minutes per item and you end up with a great custom multi-product palette.
Youtube De-potting Tutorial
Organize according to your space
My advice would be to select cosmetic organizers that match your decor and accommodate your products and the space you have available. You do not have to spend a ton to organize all or your goodies. Check out some of the options below.
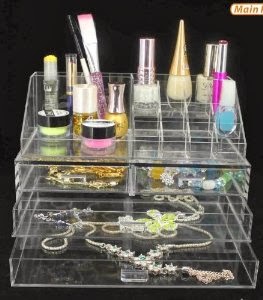
Multi-Product Organizer with Drawers
I love this divided tray/drawer combo. It's actually two separate pieces that can be stacked to optimize space. Acrylic makeup drawers can be ridiculously expensive, but I already spend a small fortune on products and can't really buy into the concept that I need to spend $200 to house my items... So I turn to cheaper options like this one from Amazon (for less than $40!). This particular organizer provides plenty of drawer space for all your blushes, bronzers, and compacts. The divided tray that fits on top holds lipsticks, mascaras, and pencils.
Lipstick Tray
 If you are a lipstick lover (you know I am!) then you know the struggle is real when you are looking for that pinky-nude and you have gone through four cosmetic bags and still can't find it! The solution is a countertop lipstick organizer. These things are less than $10 (you can find them on Amazon or at your local Bed Bath and Beyond) and are the easiest way to keep track of your ever-expanding collection.
Cosmetic Carousel
 These lazy susan-esque products are fabulous when you have tons of beauty products and not a lot of space to store them. This style of organizer rotates and allows you acces to all your products, without taking up tons of space on your vanity or dresser. The one below from Wayfair.com is less than $25 and comes in fuschia, cream, or pink.
Magnetic Makeup Holders
 When you are super short on counterspace, think outside of the box and put it all on the wall! I have seen this concept all over Pinterest and now you can buy them at The Container Store. MagnaPods (around $10) hold your items and stick to any magnetic surface. I have seen adorable homemade magnet boards made out of spray painted cookie sheets.
 I hope these organizing tips were helpful! I plan to do another post soon devoted to travel solutions for makeup junkies!
xoxo,
Alicia
No comments:
Post a Comment