Tuesday, December 31, 2013

Favorites of 2013

Happy New Year's Eve!
I loved working for Lancome and still love several of their products (Hypnose Drama and Cils Booster are my Holy Grail mascara/primer combo!) however after leaving my counter in May to return to grad school, I discovered so many amazing new products both drugstore and luxury. It took several hours to determine which products made the cut. Sorry this is a long one! Settle in with a snack and check out my top picks of the year!
TOP PICKS OF 2013
Face
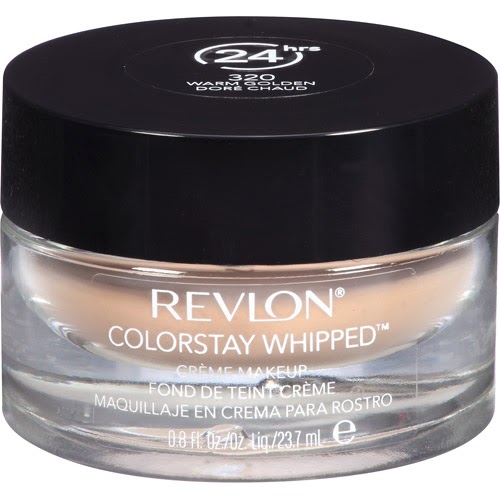
Foundation: Revlon ColorStay 24 Liquid Foundation & Whipped Foundation
Never, EVER, did I think I could find a drugstore foundation of such high quality. I use the whipped formula when my skin gets super oily (it worked great this summer and stood up to horrendous humidity!) and the liquid formula the rest of the time. Both formulas provide a flawless full coverage matte finish.
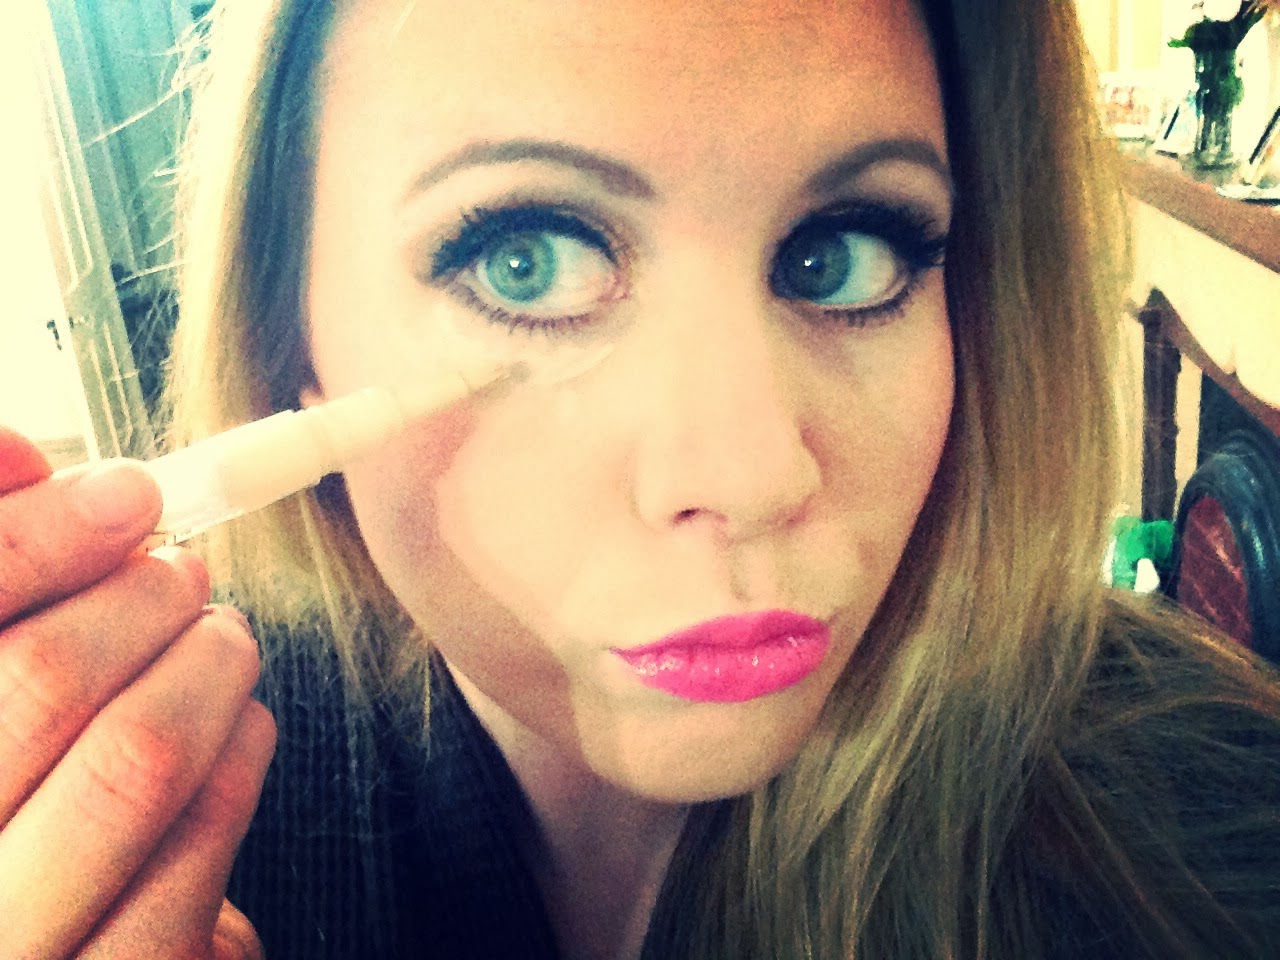
Concealer: Maybelline Dream Lumi Touch Highlighting Concealer & Bare Minerals in Well Rested
This Maybelline highlighting pen is fabulous! I use this product to draw/highlight the inverted triangle from the outside of each eye to the corners of the nose, when I contour my face. Highlighting the center of your face while contouring the cheekbones, forehead, and chin creates definition and a luminous glow. I had totally forgotten about the Well Rested powder from Bare Minerals until this fall. This powder is similar to Ben Nye's Banana powder but has a creamier consistency. The yellow undertone counteracts blue tones under the eyes and does just what the name says, makes you appear "well rested."
Powder: Ben Nye Luxury Powder in Cameo
I love to use this as a finishing powder. The pinky tones compliment my complexion well and eliminates shine.
Bronzer/Contour: Benefit Hoola
I first discovered this matte bronzer in January in a Benefit Bronzing kit. Hoola is the perfect shade of tan, no orange or red tones! I have used this on so many different skintones and it always warms up the face without looking fake.
Blush: Milani Baked Blush in Luminoso & Lorac Pro Powder Cheek Stain in Rosy Glow
I have mentioned before that I prefer Luminoso over Nars Orgasm for its softer peachy-pink tone and subtle luminosity instead of shimmer. I have not had the Lorac Pro Powder Cheek Stain long, but I am OBSESSED! Rosy Glow is a beautiful neutral rose shade that compliments cool and warm skintones. This formula is highly pigmented, with a silky finish that lasts all day long!
Highlighter: The Balm's Mary Lou-Manizer
This is another product that has shown up on my blog multiple times. I received this at the end of the summer from HauteLook and it totally lives up
to all the hype. It provides the perfect pearlescent sheen anywhere you put it. I love it on my inner corners, brow bone and just a smidge above my cheekbones. This is a universally flattering luminizer.
Eyes
Shadow Primer: Urban Decay Primer Potion in Sin & Too Faced Glitter Glue
The UD Primer Potion in Sin is pretty enough to wear alone. I wear this champagne cream primer by itself whenever I don't have time to do a full face. It also looks is a beautiful base for any powder shadow. Too Faced Glitter Glue is a new Holy Grail product for me. This is the only thing that keeps my super glittery UD shadows in place. I hate fall out... like it totally drives me nuts, so this product is a lifesaver!
Eyeshadow Palette: Naked & Make Up For Ever Aqua Shadow Waterproof Jumbo Eyeshadow Pencil in Pearly Taupe and Pearly Beige
I got the original Naked and Naked 2 in June and I immediately gravitated to the original palette. I felt like Naked 2 was filled with variations of the same shade... all with shimmer. I like the variety of neutral shades and the combination of matte and shimmer formulas. I found myself reaching for this palette throughout the year with a number of clients. The Make Up For Ever Aqua Shadow Pencils have been the MVP of my beauty collection this year. They go on smooth without creasing and provide a beautiful metallic wash of color. These are perfect for travel. You don't need a brush to apply and you can throw it in your bag and go!
Mascara: Maybelline Great Lash Lots of Lashes & Lorac Pro Mascara
I have never been a fan of mascaras with a rubber wand but this reboot of the iconic Great Lash mascara is a new favorite! Lorac Pro Mascara has a massive traditional wand that favors the style and shape of the Lots of Lashes wand. The formula and size of the wand reminds me alot of Dior's classic DiorShow mascara.
Liner: Stila Stay All Day Waterproof Liquid Liner in Carbon Black
The fine tapered felt pen liner is my ride or die favorite! It goes on super black and smooth. It sets quickly and stays on until I remove it before bed!
Lips
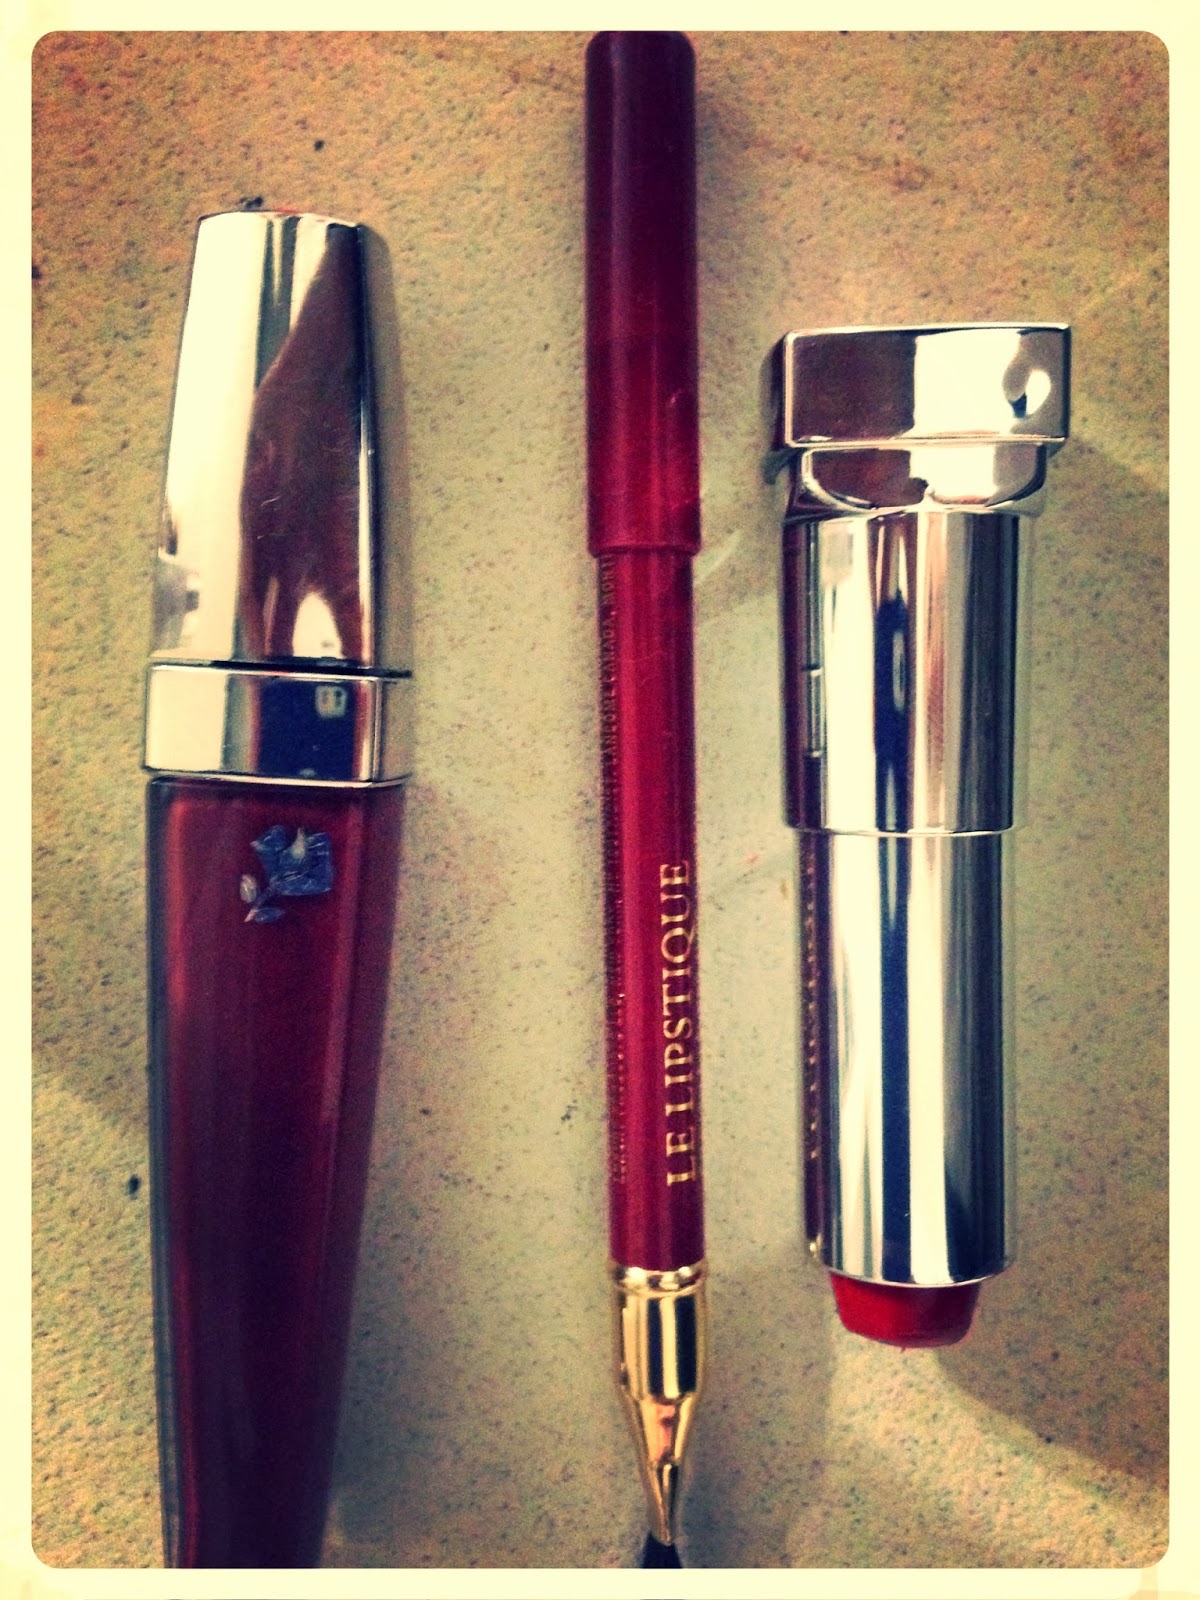
Lipliner: NYX Slim Lip Pencil in Nude Pink
Universally flattering! Another item I find myself constantly reaching for when dolling up clients. I prefer pinky nudes over traditional brown tones and this liner is a beautiful pinky beige color.
Lipstick: Maybelline Color Sensational Vivids in Fire Red
Whoo-wee this color is gorge! It is a true red that goes on beautifully with a creamy opaque finish. I have been so impressed with lipstick, I need to try more from this line!
Lipstain: Revlon Just Bitten Kissable Stain Balm in Smitten, Crush, and Sweetheart & L'Oreal Colour Riche Aqua Lacquer Lip Stain in Rose On and On and Pink Persistence
If you read my blog, you know I love me some Kissable Balm Stain! They are a great dupe for Clinique's Chubby Sticks... but better! More pigmentation, longer lasting, and comfortable on the lips! I have several shades but the three above are my faves. L'Oreal Aqua Lacquer Lip Stain is an amazing dupe for YSL Glossy Stain. They feel good on the lips, sets quickly, and stays glossy for hours!
Lipgloss: Buxom Lip Polish in Sandy & NYX Butter Gloss in Strawberry Parfait and Maple Blondie
Buxom Lip Polish is a creamy gloss that I love layering over brighter lipsticks to tone them down a bit. Sandy is a perfect pale pinky nude... I told you I loved it! The NYX Butter Glosses are the best feeling glosses I have ever tried. They glide on and bring a transparent and highly pigmented sheen to the lips. Strawberry Parfait is a perfect bright Barbie pink and Maple Blondie is a warm pinky peach that looks great with bold eyes.
Hair, Skin, Nails & Accessories
Tools: Crown Infinity Brushes
LOVE LOVE LOVE these brushes. The flat top kabuki creates a flawless finish in seconds. The precision tapered brush is the best brush I have ever found for concealing. The wooden handles could be a tad nicer but the price tag for these brushes is unbelievable.
Nail Product: Red Carpet Manicure in Paparazzi
I love this gel nail kit. For the price of two manicures, you get the entire kit! Paparazzi is the most fabulous vibrant pinky purple (aka Pantone's color of the year, "vivid orchid").
Hair Product: L'Oreal Repair 5 Damage-Erasing Balm & L'Oreal EverStyle Energizing Dry Shampoo
The Repair Balm is the best mask I have ever found. I leave it in my hair while I shave my legs and then rinse it out. It makes my hair so soft and silky and my split-ends are smoothed. The Energizing Dry Shampoo works wonders on day 2 hair, getting rid of greasiness and amping up hair's volume.
 Not Worth the Hype:
Benefit They're Real Mascara: Don't get your panties in a bunch! I know that this is some folks' Holy Grail mascara, however, I was not impressed. The nubby tiny bristles on the rubber wand and formula are meant to increase definition, but the wand did nothing but make my lashes look like clumpy spikes... Not exactly the look I was going for.
NYX The Curve Liner: I loved the idea of this product but I did not feel like it was helpful in creating a cat-eye and the formula dries quickly, fades, and flakes off midday. The felt tip dried up in less than 3 weeks. This product is $15, shell out $5 more and you can have Stila's Stay All Day, which is the best liquid liner I have ever found.
Lorac POREfection Mattifying Primer: Feels smooth on the skin but there is NO mattifying properties to this primer. I believe it would work for those with normal to dry skin, but for those girls with oily skin you will be shiny within an hour. I almost feel that this product increased the shine on my t-zone.
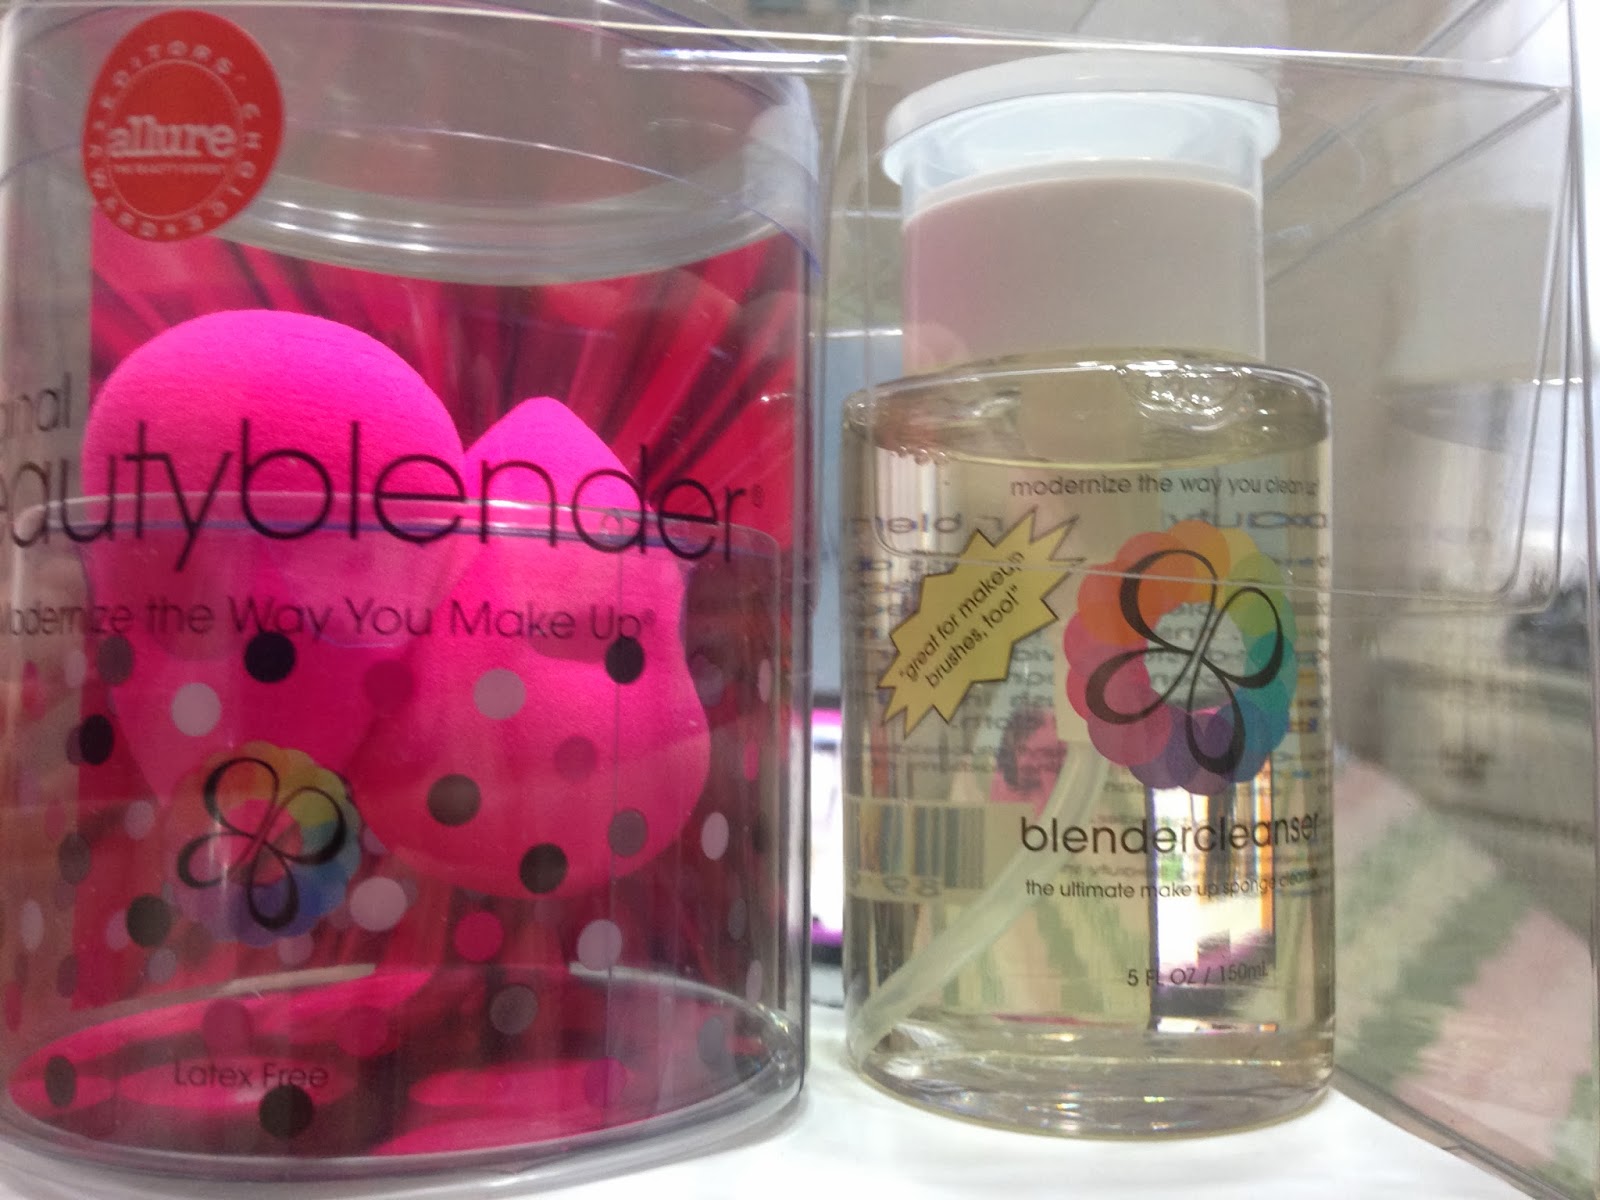
Beauty Blender: Don't get me wrong, I like my Beauty Blender just fine I just don't want to spend 4 times as much when I don't have to. It works wonders on seamlessly blending out concealer and applying liquid highlighter. When a friend found an almost identical dupe for $5, I traded my Beauty Blender for EarthTherapeutics Blending Sponge.

Wanting to branch out in the new year?
Purchasing a couple of different Sephora SuperStar gift sets is also a way to try out different high end products, most of them being full-size! Somehow I completely forgot that the drugstore brands have some pretty fabulous and innovative cosmetics. If you are a beauty junkie like me, who may also be on a budget, I love stocking up at CVS and Ulta during BOGO 50% off sales.

Happy New Year dolls! See you in 2014!
xoxo,
Alicia

Monday, December 30, 2013

New Year's Eve Makeup

It's the eve of New Year's Eve... time to break out the glitter! I chose a creamy pearlescent pewter shade with green shimmer for the center of the lid and a smoky grey for the crease. The green shimmer keeps the look from getting too "racoony." You definitely need to prime your lids with a tacky base to hold this packed pigment in place. I like to pat this type of product on instead of sweeping on with a brush. I smoked out the outer "v" with a matte black shade with a small liner brush, and then buffed it out with a dense blending brush to soften the look. I went with a pearly luminizer in the inner corners to brighten the eye area. With so much happening on the eyes, I chose to go with glowy highlighted skin with a subtle contour and defined brows. A pale pinky-nude lip balances the dramatic look. Most of the items I used for this look are higher-end, but I will include dupes for most products along with links.

Eye Products
Too Faced Glitter Glue 
(Hard Candy Sheer Envy Primer, can be found HERE)
Lancome Infinite 24HR #503 Electrifying Sparkle 
(L'Oreal Infallible 24HR EyeShadow Golden Sage is a great dupe... the formula of these pressed pigments are almost identical! Can be found HERE)
Sephora MicroSmooth Baked Eyeshadow Trio in Smoky Matte
(L'Oreal Colour Riche Shadow Quad in Black Pump, can be found HERE)
Stila Stay All Day Liquid Liner in Carbon Black
(Milani Eye Tech Extreme Liquid Eyeliner in Blackout, can be found HERE)
Lancome Le Crayon Khol in Black Ebony
(Revlon Luxurious Color Eye Liner in Black Velvet, can be found HERE)
Lorac Pro Mascara
(Maybelline Great Lash Lots of Lashes, can be found HERE)
Lilly Lashes in Milan
(Ardell Demi 120, can be found HERE)
The Balm Mary Lou-minizer
(Physicians Formula Mineral Glow Pearls Powder in Translucent, can be found HERE)

Lip Products
NYX Lipliner in Nude Pink
Rimmel London Lipstick in Dreamy
Buxom Lip Polish in Sandy
(Maybelline Color Elixer Lip Color in Petal Plush, can be found HERE)


Wishing you all a safe and happy new year's celebration!
xoxo,
Alicia

Santa Baby... Was good to me!

Hi there dolls! I hope you all had a happy Hanukkah/Christmas/Kwanzaa! I hope that your holidays were spent surrounded with family and friends, and you got just what you wanted. Santa was very good to me this year and brought me some fabulous beauty treats. I asked for a few of my faves but also got some great new products that I have been wanting to try out. I got a lot of goodies from NYX and Stila that I love (my beloved Eyebrow Push-Up Bra and Stay All Day Liquid Liner among them) but I wanted to share with you some of my favorite newbies and some great kits!


Crown Infinity Brush Set
I had been eyeing this set on HauteLook months ago, but missed the opportunity to get them before they sold out. I picked the set of 8 synthetic duo-fiber kabuki on sale on Black Friday for $45 (this was a gift from my mom... I picked it out, she paid!). These brushes are ridiculously amazing. They are quite similar to Sigma's Sigmax Set (see side-by-side pics, my brushes are on top and to the left) and MAC's Duo Fibre brushes. The Sigmax set is priced at $146! I have been extremely impressed with the quality of these brushes. I did some research on these and found out that they come highly recommended by 3 time Oscar winning makeup artist Ve Neill (she has worked on the Pirates of the Caribbean movies, Spiderman, and The Hunger Games... just to name a few!).  They pick up product amazingly without absorbing and wasting it. The 8 brush set includes 4 large kabuki brushes (tapered, flat top, round top, and angled) and 4 small versions of the same for precision application.The large flat top kabuki applies liquid and cream foundation flawlessly! I use airbrush makeup and this is the closest I have ever encountered to an airbrush finish. I love the small angled kabuki for precise contouring (cheekbones and
nose) and then I blend out with the large angled kabuki. The large angled kabuki is especially amazing when contouring large areas of the face like the jawline and forehead. These quality brushes make my contouring/highlighting routine so much easier and blend out effortlessly! The small tapered kabuki is perfect for under-eye concealing. I like the large tapered kabuki for highlighting. I find the round top kabuki brushes (both large and small) to be best at buffing out powder products. I could not find the Infinity brushes sold as a set on the Crown website, so apparently they are a HauteLook exclusive. Keep checking the HauteLook website, they usually feature Crown every couple of months so you should be able to score them on sale again soon!


Lorac Close Up Red Carpet Pro Face Tutorial 

My love muffin got this for me after a few not-so-subtle hints, and this kit is an amazing value! I had been wanting to try the Lorac Pro Powder Cheek Stain for a hot minute. The blush is usually $20 but this kit is $42 and you get 3 full-size products and 2 deluxe-size products. The kit includes: Pro Powder Cheek Stain in Rosy Glow, Pro Mascara, Lip Lustre Lip Gloss in Peach Lustre, Mini Pro Palette (3 shades), and POREfection Mattifying Face Primer (0.85 oz.). I absolutely LOVE this cheek stain, it is a super pigmented and super long-lasting formula that goes on smooth and silky... but be forewarned that the formula sets quickly so blend out fast! The Mini Pro Palette contains 3 shades (shimmer beige, matte light brown, matte espresso). I prefer to use a wet brush (I spray my brush with water or UD De-Slick) to apply these shadows. They are very pigmented and the Lt. Brown and Espresso are much darker than they appear in the pan. The mascara is very similar to Make Up For Ever's Smoky Extravagant mascara with its extra large tapered cone-shaped wand. I did not have high expectations for this product since I basically purchased this kit just for the blush, but was quite surprised by the crazy volume and separation this mascara creates. The primer is almost one ounce, just 0.15 oz. shy of the full-size version. I am not completely convinced that this primer is mattifying. I am an oily gal and noticed a good bit of shine on my nose and forehead a few hours after applying my makeup. I don't love the Lip Lustre Lip Gloss, the color is beautiful but there is too much shimmer for my taste and it is a bit thick and sticky. Overall, if you can still get your hands on this kit (Ulta.com is sold out!) grab it! It's an awesome deal on high quality products!

Lancome Hypnose Drama Set
I was so happy to get this from my little sister! If you have ready any of my previous posts you know that Hypnose Drama is my all-time favorite mascara, and this kit also contains two other amazing products from Lancome: ArtLiner Liquid Liner in Noir and Bi-Facil Eye Makeup Remover (the best makeup remover EVER!). Hypnose Drama is $27 at the Lancome counter but this kit includes the mascara, full-size liner, and a deluxe-size makeup remover all for $33! This kit is till available on sephora.com, so jump on it!

Did you get any special beauty gifts over the holidays?! I would love to hear what you got, so feel free to share in the comments below!


Keep up with new blog posts by liking me on Facebook or following me on Instagram!
I will have a NYE tutorial posted tomorrow evening and then my 2013 Favorites will be posted on Tuesday!

xoxo,
Alicia

Monday, December 23, 2013

Festive Holiday Makeup

I recently went to a "tacky Christmas party," where bows, sequins, and glitter are basically required... which is right up my alley. I love to have a reason to go all-out (themed parties are literally my jam). For this particular party, I decided that a green smokey eye and a berry lip were absolutely necessary.

A few tips for sporting bold eyes AND lips:

  • Tend to your brows. Polished brows really frame the face and pull together loud eye looks.
  • Defining your lash lines and using lipliner works the way defining the brows does, by adding "boundaries" around bold colors you are creating a much more cohesive look.
  • Use primers! You need a good eye primer to achieve a "fun and festive" not "disco glitter queen" look.  I like sticky bases when using any product with a good amount of shimmer. When the primer is tackier, there will be less fallout. Also applying a primer to the face, smooths out the complexion and preps the face for foundation.
  • Use a lighter hand with bronzer and blush. When doing such a bold look, you need a smooth and even canvas so that the final result is striking and not at all clownish. 


Products:


Eyes:

Too Faced Glitter Glue
Tarte green eyeshadow quad -2012 holiday palette (Maybelline sells a similar quad called Gutsy Green)
Lancome Gel Liner in Black Fishnets
Ardell Glamour Lashes #105
NYX Eyebrow Pushup Bra

Face:
Revlon Colorstay 24- Nude
Lancome Effacernes Concealer- Clair
Maybelline Dream Lumi Concealer- Light (for highlight)
Benefit Hoola
Lancome Blush Subtil- Aplum
Ben Nye Luxury Powder- Cameo

Lips:
Lancome Le Lipstyque- Deep Berry (try NYX liner in Ruby)
Maybelline Vivid Lipstick- On Fire Red
Lancome La Lacque Fever- Dynamic (L'Oreal Aqua Lacquer in Endless Red is a great alternative)

1.) Prep lids with Glitter Glue.
2.) Apply the bright green shade (top right) all over the lid.
3.) Apply the dark green (bottom right) to the crease, sweeping into the outer "V" of the eye. Use the army green shade (bottom left) as a transition color.
4.) Gently PAT on the glittery light green shade (top left) onto the center of the lid. (I strongly recommend spraying a dense shader brush with a setting spray like UD All Nighter or MAC Fix Plus before loading brush with shadow. Tap off the excess. If you try to brush this shade on you will have tons of fallout).
5.) Curl lashes and apply one coat of your fave mascara (I like Maybelline Great Lash "Lots of Lashes" w/the pink wand).
6.) Apply your fave strip lashes (I suggest Ardell 105 or 101, they are super black but more natural-looking than others in the Glamour line).
7.) Using gel liner (or liquid if you prefer), go over your top lash line. This will cover any tell-tale signs that you're wearing falsies while also adding some definition to all that color you got happening on the lid.
8.) Apply face primer and foundation. Lightly contour the face and apply a berry blush to the apples of the cheeks. Set with a translucent powder.
9.) Line and fill lips with a berry liner. Carefully apply lipstick (remember that neat lines keep this look polished) and top with a deeper shade of lipgloss with a subtle shimmer on the bottom lip (lips will appear fuller).
10.) Fill in brows and set with wax to hold shape. Apply a matte cream highlight to the browbones.


*Just thought I'd add a pic of our tacky get-ups! That mountain man is my love, Michael ;)

Merry Christmas Dolls!!

xoxo,
Alicia

Saturday, December 14, 2013

Face Contouring 101

I have gotten a few questions lately about contouring and highlighting, so I thought I would share what products work for me and exactly how I go about contouring my face. Remember that anywhere you place your contour, you are creating shadow and will diminish the area. Contour should be used in places that you would like to streamline (hollows of cheeks, slimming the nose, defining the jaw). In contrast, highlighting draws in the eye and makes the area stand out. You apply a pearlescent (avoid chunky shimmer!) product to illuminate areas of the face (brighten under the eyes, define cupid's bow of lips). Learning how to contour can completely transform your features and is one of the most valuable skills I have learned along the way.

What you need:

1.) Small contour brush. My fave is Lancomes #25 dual-ended blush/contour brush.
2.) Contour color or matte bronzer: I like Benefit Hoola bronzer, it has neutral undertones and works on most skin tones.
3.) Natural blush shade: Nars Orgasm is universally flattering and provides a perfect corally-pink glow.
4.) Highlighter: Product type depends on your skin type. I really like Maybelline Dream Lumi Highlighter/Concealer, a gel formula good for oily skin, in a shade two shades lighter than your skin tone. For normal skin tones, I recommend The Balm Mary Lou-Manizer, a gorge iridescent balance of pink/gold/silver tones. Those of you with dry skin tones should try cream or liquid illuminators, I like Benefit High Beam.


Step 1: Where should my contour go?
The best way to decide where to place your contour is to hold a brush diagonal across your cheek from the top of your ear. Suck in your cheeks and make a fishy face, your cheekbones should appear more prominent and the hollows of your cheeks will sink in. The contour should be below your cheekbone.


Step 2: How do I apply my contour?
For the most natural contour, start on the outside and chisel in a short diagonal line. I like for my contour to end right under the outer apex of my cheekbone, going any further in can make your contour look more like drag makeup. You want to create the illusion of an indentation below your cheeks, making your face appear thinner and more sculpted. It will look a bit scary and dramatic before you blend it out. Continue to buff the line from the inside out (just as you would fade out the edges of a smokey eye look). There should be no harsh lines, just a smooth contrast in color that is a bit more defined on the outside of the cheek. Without using any additional product, drag your contour up around the hair line and jawline. Be sure to blend the color out. This will balance your cheek contour and make the jawline appear more defined. If you would like, you can also contour your nose if you would for it to appear thinner. To this, I use an even small contour brush and apply the tiniest amount of color on the outsides of the nose and just around the outer edges of the nostrils.


Step 3: Where does my blush go?
Your blush go directly above your contour. The placement of your blush is what makes this look. Placing your blush directly on your cheekbone, and again applying the product from the outside in leaves the most
concentrated color on the outside and pulls just enough color onto the apples of the cheeks, creating a natural flush. Blend the color from the apples of the cheeks out to meet the diagonal line formed with the contour color.

Step 4: How do I highlight?
I use a highlighter/concealer duo under my eyes, right up to my blush and blend out. I also use this product above my brows, around my nose, and above my lips. The center of the face should now be the lightest portion of the face. Again, this will slim the face and draw attention to your eyes, lips, and (newly) stunning cheekbones.

Final Product
Hope you enjoyed this post! Let me know in the comments if you would like more tutorials like this. If so, I'd love to hear what you dolls might want a tutorial on!

xoxo,

Alicia


Sunday, December 8, 2013

Mixing It Up With OCC Lip Tar Color Combinations

Hello lovelies!

Left to right: Melange, Grandma, Pretty Boy,
Stalker, Vintage
I got tons of feedback after my October post about Obsessive Compulsive Cosmetics Lip Tar. I mentioned in the post that these highly pigmented lip stain/gloss/liquid lipstick were designed to be worn both alone or mixed together to create custom shades. I love using these for events due to their excellent color payoff, longevity, and creamy consistency. I purchased a kit earlier in the year that included five lip tars. The colors are bold, and I usually only wear Pretty Boy or Stalker straight from the tube. I like to mix the other colors to develop shades that flatter each specific client. I am glad that I purchased the kit because it provided such a wide range of bold colors that I am able to alter shades to suit any skintone. 
The shades on the right side of the palette are straight from the tube and are in the same order as above. The shades on the left are some of my most used color combinations. You only need a tiny drop of product, you will be surprised how far just a drop goes! I mixed these colors with the lip brush that was included in the kit. If you would like to create several custom lip colors, remember to clean the brush really well in between. It is also important to remember that this product requires a steady hand and stains easily. 

Custom colors are listed counter-clockwise.
1.) Melange + Grandma = orangey-nude 
(So pretty on darker skintones)
2.) Grandma + Pretty Boy = coral
(Very flattering on anyone with golden undertones)
3.) Pretty Boy + Stalker = raspberry
(LOVE this shade with fair complexions... and especially paired with glowing skin and shimmery eyes)
4.) Stalker + Vintage = deep berry (favorite fall/winter shade for all skintones)
5.) Melange + Grandma + Pretty Boy = warm rosy pink (my go-to combo for brides, and the one featured in my previous Lip Tar post)


*Melange/Grandma
*Grandma/Pretty Boy
*Pretty Boy/Stalker
*Melange/Grandma/Pretty Boy
*Stalker/Vintage


All of the swatches were made with one swipe of the brush! Check out the pigmentation and how opaque the formula is!! I hope this helps all of you that had questions about mixing your own shades of Lip Tar!

xoxo,

Alicia

Tuesday, December 3, 2013

November Favorites

Hello there dolls!

I wanted to share the products I kept reaching for this month. I did mostly bridal and boudoir this month, so the items in my list will be ones that are particularly suited for photos. Most of my product recommendations are items that I have found to create glowing beautiful skin.

Victoria's Secret Fresh Face Brightening Gel Cream

I got received this product from a friend over the summer but just recently busted it out... and I am so glad I did! This gel cream creates a subtle pearlescent glow anywhere you put it. I love this product for boudoir photos because it gives just enough dewiness without creating a super shiny look. I like to apply it right above the cheekbones and on the collar bone, highlighting these angles on the face and body, and avoiding areas where natural shine pops up (t-zone area). This product makes the skin appear fresh, and is also slimming. I only use this product on clients with normal to dry skin (so sad that I can't wear it!). For clients with oily skin like myself, I opt for a powder highlighter to mimic the effect. Also, I would not recommend this type of product for an event like a wedding, natural shine will continue to peak through makeup over time and the whole face will begin to look slick.

Maybelline Dream Lumi Touch Highlighting Concealer

I am in LOVE with this product!! I have used this product every day since I purchased it. First off, pretend that concealer is not in the name because that's not its main purpose. The gel-based highlighter is the perfect consistency, not too thick or thin, it goes on smooth and blends well. Though this product does lightly conceal, I find it most useful when counteracting blue tones under the eyes and illuminating skin. If you use a full coverage foundation, you may get away with using this as a concealer. When I use my Revlon Colorstay Whipped foundation, this highlighting pen is enough to conceal any darkness peaking through my foundation. My preferred method of use is to apply your normal concealer and then pat this on (I use the pointy end of a Beauty Blender) under the eyes, around the nose, and above my brows creating almost a heart shape in the center of my face. After applying this product, you may go on with your regular powder/bronzer/blush routine but I especially love this product paired with contour and blush. For my skin, this combination of products works better at creating a soft sculpted look...I'm not a fan of harsh contouring/highlighting.

Ben Nye Cameo Luxury Powder

You may be familiar with Ben Nye Banana Powder (the yellow powder Kim Kardashian's makeup artist
uses to conceal/brighten/highlight when contouring her face) but I love Cameo, which is better on skin tones with pinky undertones, as an all-over finishing powder. It is a super-silky finely milled powder that blends like a dream. The finish is a very natural satin-matte finish. This cool-toned shade is translucent, yet has just enough pigment to brighten skin. If you have medium skin tones, I would go with the Buff shade which is a bit darker and has more of a golden undertone. I love Ben Nye products, this line was specifically created as theatrical makeup and is great quality. I love all of the Luxury Powders but Cameo is a personal fave.

Ardell Natural Lash Black #109

This has become my go-to strip lash recently. The natural curve of the lash is perfect for weddings and looks soft and pretty in photos. I end up trimming down most lash-dense strips to soften them up (making them look more delicate and less drag, hehe!). This strip blends with natural lashes easier than any other I have tried. These are usually undetectable, most people will think you are just born with gorgeous lush lashes!


Ben Nye Final Seal

This is the grand-daddy of all setting sprays! This is yet another Ben Nye miracle product.
This product is used at Disney theme parks to keep the Disney princesses' makeup on all day in all weather conditions. It literally locks down makeup the way hairspray sets your hairstyle. This product is perfect for weddings, it is sweat-proof and waterproof! It does have a minty scent (and tingle!) that some may not love, but I don't mind it. After applying all of your makeup, hold the bottle several inches from your face and spritz in horizontal motions. You do not need alot of this product, a little goes a long way! Also, I recommend pulling hair away from your face because it will literally glue it to your face. Don't forget to wash your face before bed because you will wake up with a full face of makeup the next morning.


Did you score some great beauty deals on Black Friday or Cyber Monday? I would love to hear about it or see pictures of your goodies!

xoxo,

Alicia